
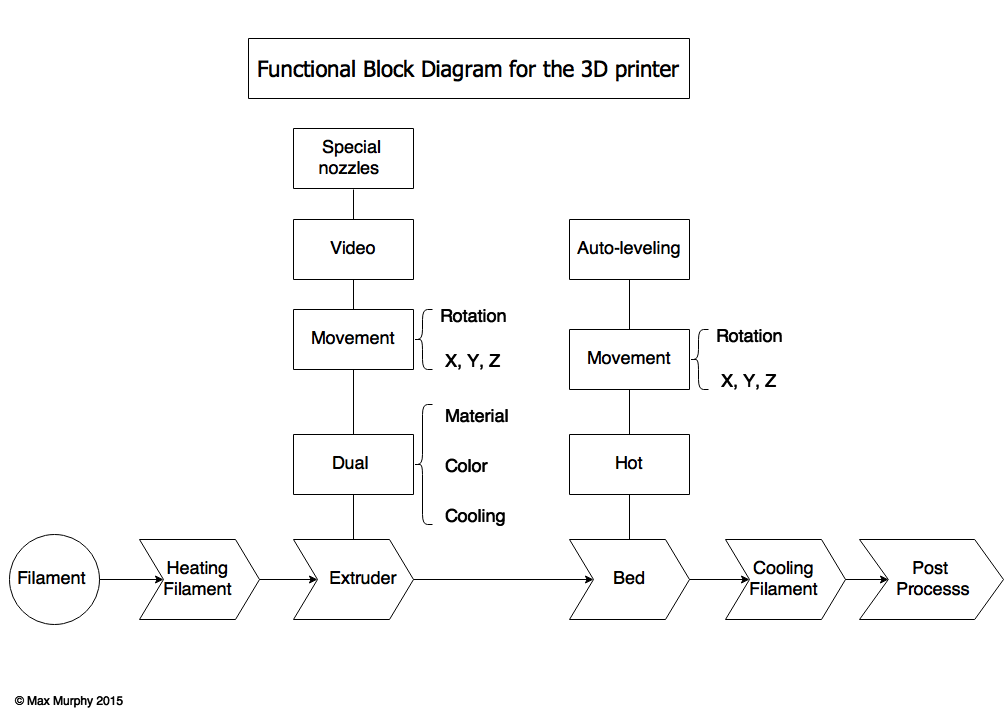
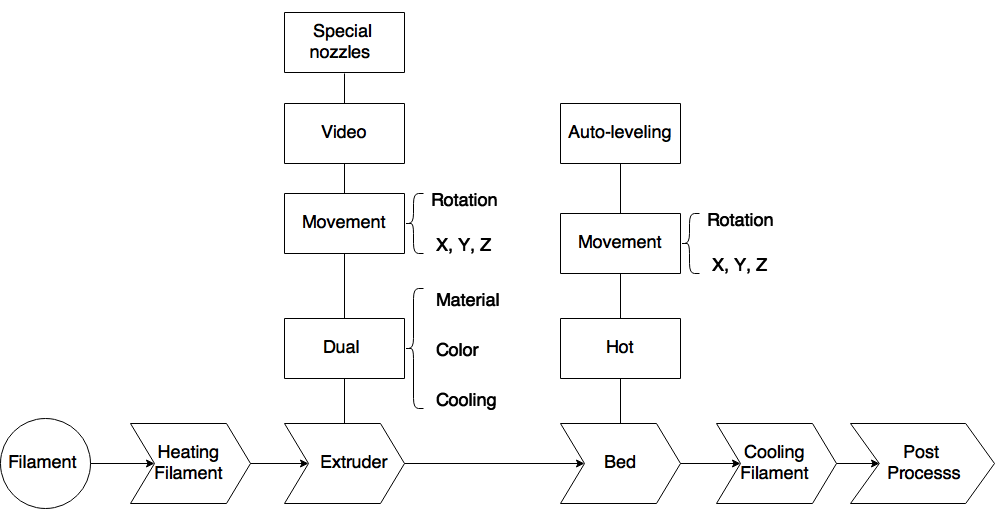
This 3D Printing Evolution Functional Block Diagram shows the process flow of 3D printing in the X direction and the evolution of the functional blocks in the Y direction.
Extruder
Dual/Multi extruder
The first improvement to the extruder, that several 3D printers have now, is the dual extruder capability. Printers with a single extruder can perform multi-color and multi-material operations but it is faster and easier to perform these operations with multiple extruders.
3D printing and multi-material functionality has spark a huge interest in material science; people have invented wood, ABS like PLA, nylon, flexible PLA, stone, carbon fiber, and other special filaments. Not only has 3D printing material undergone significant material research, but MIT found a way to enforce spider webs with carbon fiber to make it a stronger. It is also going to be interesting to see special blends of materials in creating objects. Multi-material functionality allows for optimized design: strain issues can be addressed with more flexible material and stress issues can be addressed with more rigid material. Currently this can be done if each part is done in different and distinct areas, but in the next five to ten years design software will allow for objects to be designed for a blend of materials. While the FFM printer have a wide range of available filaments, there is not a huge range of different resins available for SLA printing so it will be interesting to see what resins may be developed in the years to come.
Cooling extruder
One way to decrease the overall print time would be to increase the rate at which the filament is coming out of the extruder; however, the layer before must be fully solidified before the next layer of plastics is placed. One possible solution to this problem would be to add a special cooling head that would trail the hot print head to the hot plastic solidify faster.
Movement
Different 3D printers have different ways to move the extruder. A lot move the extruder in the Cartesian coordinate system or in the X, Y, and Z direction and the most common ways of doing it is by moving the extruder in the X and Y direction while the bed moves in the Z direction or have the extruder move in all three directions around a stationary bed. Having both the bed and extruder move in the X, Y, and Z direction could be a way to minimize the travel time.
Special nozzles
The extruder might be able to change the print head diameter at different times during the print similar to how cake frosting have special decorative tips.
Video Camera
Equipping 3D printers with a video camera–or a pair for stereoscopic view–will enable real time monitoring of the printing process either by algorithmic control or remote monitoring by human operators. The print job could be aborted and restarted, preventing wasted time and material. Depending upon what other postprocessing capabilities are available, or in a printer that supports both additive and subtractive manufacturing, a complex part could be reworked and completed.
Bed
Hot Bed
Many printers already have the functionality of heating the bed to improve print quality and protect against the warping during the print job.
Movement
As mentioned above, both the bed and extruder could move in the X, Y, and Z direction to minimize the travel time. As for the delta 3-D printers, they could have their circular base to rotate to make the travel time faster of the print head.
Auto-leveling
As someone who has used a variety of 3D printers, the leveling of the bed is one of the most annoying thing in 3D printing and even the slight height difference could stop print jobs from being completed. The Creatbot is the only 3D printer that I know of that has an auto-leveling bed and other great features.
Post Processing
Current methods for post processing include deburring, sanding, priming, airbrushing, and application of acetone. One of the biggest misconceptions with 3D printing is that the 3D printer can print out objects just as nice as store bought items.
There might an effective trade off between a very high resolution print with no post processing and a lower quality print and some post processing to make it smoother. The two major factors to be considered in these processes is speed vs structure integrity. If the goal is to achieve a faster time while not worrying so much about the strength of the object then the low resolution with the post processing seems to be better choice; however, if it is a functional part then the first option is a safer choice.
Missing Dimension: Information & Modeling
The CAD model development and related data flows are an important dimension of 3D printer functionality. Scanners, CAD design system, design rule checks, model repair tools, and other software that creates, modifies, or verifies the models needed for an object to be printed are undergoing as significant a rate of evolution as the functional blocks identified here. A truly complete functional block diagram would include them.
About the Author
Max Murphy is Mechanical Engineering student in his Junior year at California Baptist University. He is interested in the implications of 3D printing or positive manufacturing for mechanical design. He is currently an intern at Soundfit, one of the companies that is part of the Bay Area Advanced Manufacturing Hub (BAAM), where he is gaining hands on experience with a 3D printer and scanner and an intern at Neodyne Biosciences working with the R&D and Q&A departments.
About The Functional Block Diagram For 3D Printer
 The 3D Printer Functional Blog Diagram is an original composition by Max Murphy. It is available for use under a Creative Commons Attribution-NonCommercial-NoDerivatives 4.0 License
Pingback: SKMurphy, Inc. 3D Printing Tradeoffs and Optimization - SKMurphy, Inc.
Pingback: My new domain for 3D printing blog posts | 3D printing
Pingback: Biomimicry With 3D Printing of Shapes and Surfaces | 3D printing
Pingback: 4D printing | 3D printing